Securing RabbitMQ and Celery with TLS/SSL (mTLS) — A Complete Guide
Messaging systems are foundational components of modern distributed architectures. Whether you're running asynchronous workloads, orchestrating microservices, or building event-driven systems, your message broker becomes the communication backbone. And like every critical infrastructure component, it must be secured properly.
RabbitMQ is one of the most widely adopted brokers in production environments. This guide walks through securing it using TLS encryption and Mutual TLS (mTLS) — both essential for protecting data-in-transit and verifying client identity. We will also configure Celery, the most popular Python task queue, so workers authenticate using certificates rather than passwords.
🧠 Why TLS Matters for RabbitMQ
RabbitMQ is a powerful message broker that helps decouple services and scale applications, but by default it transmits data in plaintext. This means credentials, messages, and metadata can be intercepted over the network if encryption is not enabled.
That’s where TLS (Transport Layer Security) comes in.
🛡️ What Are TLS and SSL?
TLS is the modern protocol used to secure data traveling across networks. Although SSL is deprecated, many still use the term "SSL" informally to refer to TLS-based secure communication.
Core security guarantees:
- Encryption — prevents attackers from reading your messages.
- Authentication — verifies who you're talking to (server-only or mutual).
- Integrity — ensures your messages aren’t tampered with.
TLS is used everywhere: HTTPS, FTPS, SMTP, gRPC — and of course, RabbitMQ.
🛡️ TLS vs mTLS — What’s the Difference?
TLS encrypts traffic and authenticates the server. mTLS (Mutual TLS) authenticates both parties.
TLS (One-way TLS)
- Client verifies the server certificate
- Traffic is encrypted
- Client still uses username/password to authenticate
mTLS (Mutual TLS)
- Client presents its own certificate
- Server verifies client identity cryptographically
- No passwords required
- Ideal for microservices, Kubernetes, service meshes
Comparison
| Feature | TLS | mTLS |
|---|---|---|
| Encrypts traffic | ✔ | ✔ |
| Verifies server identity | ✔ | ✔ |
| Verifies client identity | ❌ | ✔ |
| Requires passwords | ✔ | ❌ |
| Zero-trust ready | ❌ | ✔ |
We choose mTLS because it ensures only trusted workloads can communicate with RabbitMQ.
1. What Is RabbitMQ?
RabbitMQ is a high-performance message broker implementing AMQP. It enables asynchronous communication between distributed services.
RabbitMQ offers:
- ✔ Decoupling between services
- ✔ Reliability (acks, retries, durability)
- ✔ Advanced routing (topics, fanout, direct)
- ✔ High availability & clustering
- ✔ Multi-language support
Because it connects many services, it becomes a high-value security target — TLS/mTLS is essential.
2. What Is Celery and Why Does It Use RabbitMQ?
Celery is Python’s most popular distributed task queue, enabling:
- Background processing
- Async jobs
- Scheduled tasks
- Parallel workers
- Long-running processing
Celery workers maintain persistent connections to RabbitMQ — so securing the broker is mandatory.
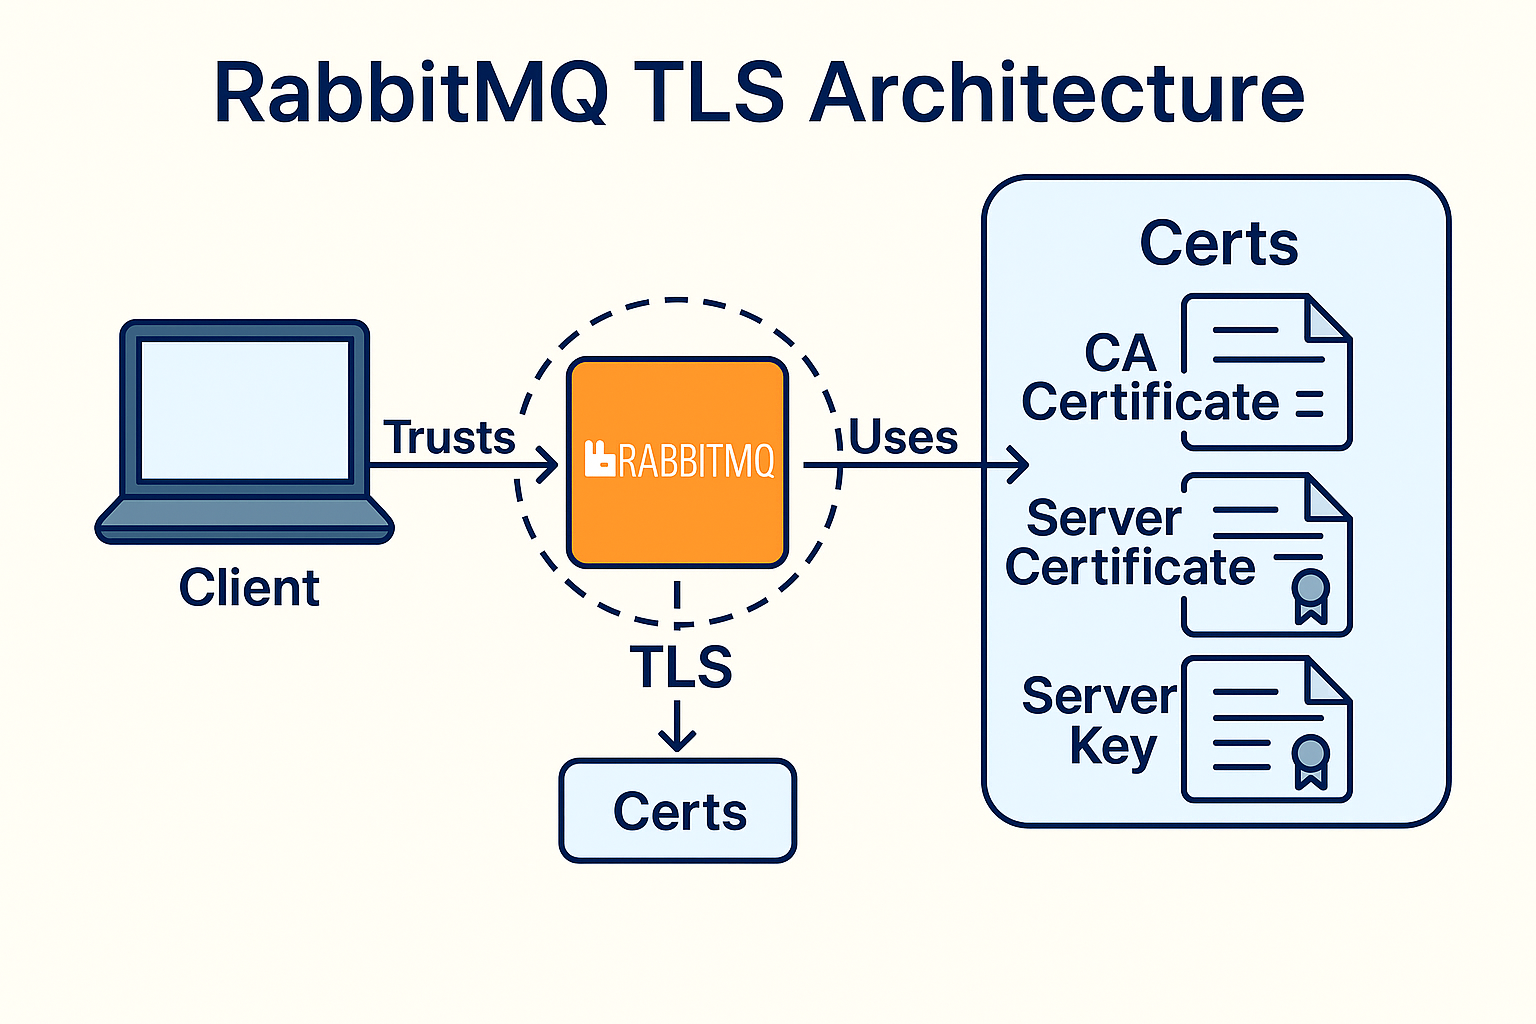
4. Understanding Certificates
RabbitMQ requires three types of certificates:
- CA Certificate — trusted authority
- Server Certificate — identifies RabbitMQ
- Client Certificate — identifies Celery workers
5. Prerequisites
Before generating or configuring any certificates, make sure you have
Docker installed. In this guide, we use the official
rabbitmq:4-management Docker image throughout the entire setup.
This approach keeps the environment reproducible, avoids system-level
modifications, and ensures RabbitMQ always runs with a clean configuration.
[link]
All TLS files, configuration files, and definitions will be mounted into the container, so nothing needs to be installed directly inside your operating system. You will create a local project structure similar to:
project/
  ├── rabbitmq/
  │     ├── ca_certificate.pem
  │     ├── server_certificate.pem
  │     ├── server_key.pem
  ├── celery-certs/
  │     ├── ca_certificate.pem
  │     ├── worker_cert.pem
  │     ├── worker_key.pem
  │     ├── client_cert.pem
  │     └── client_key.pem
  ├── rabbitmq.conf
  ├── definitions.json
  ├── Dockerfile
  └── docker-compose.yml
The certificates you generate will be placed inside the rabbitmq/ and celery-certs/ folder,
and Docker will automatically mount them into the container under
/etc/rabbitmq/certs.
To enable TLS or mTLS in RabbitMQ, you must have the essential certificate files:
ca_certificate.pem
server_certificate.pem
server_key.pem
client_certificate.pem
client_key.pem
You can generate these using tls-gen (the official RabbitMQ tool) or manually with OpenSSL. Both methods are shown below.
Generate certificates using tls-gen
# Clone the official tls-gen repo
git clone https://github.com/rabbitmq/tls-gen.git

cd tls-gen/basic

# Generate certificates
make

# Certificates will appear under:
# ./result/
Generate certificates using OpenSSL
You can use my custom script that automates the entire certificate-generation process for securing RabbitMQ and Celery with TLS and mTLS. It creates a root Certificate Authority (CA), generates and signs the RabbitMQ server certificate, and then produces client and worker certificates for Celery, all using OpenSSL. The output is organized into separate directories (rabbitmq/ and celery-certs/) to keep server and client credentials clearly separated.
#!/bin/bash

set -e

# Folder structure
mkdir -p rabbitmq
mkdir -p celery-certs

echo "🔐 Generating CA..."
openssl genrsa -out ca.key 4096
openssl req -x509 -new -nodes -key ca.key -sha256 -days 3650 \
  -out ca_certificate.pem \
  -subj "/C=US/ST=CA/L=SanFrancisco/O=MyCompany/OU=Security/CN=MyRootCA"

echo "📜 Generating RabbitMQ server cert..."
openssl genrsa -out rabbitmq/server_key.pem 2048
openssl req -new -key rabbitmq/server_key.pem -out server.csr \
  -subj "/C=US/ST=CA/L=SanFrancisco/O=MyCompany/OU=IT/CN=localhost"

openssl x509 -req -in server.csr -CA ca_certificate.pem -CAkey ca.key -CAcreateserial \
  -out rabbitmq/server_cert.pem -days 825 -sha256

cp ca_certificate.pem rabbitmq/

echo "👤 Generating Celery worker cert..."
openssl genrsa -out celery-certs/worker_key.pem 2048
openssl req -new -key celery-certs/worker_key.pem -out worker.csr \
  -subj "/C=US/ST=CA/L=SanFrancisco/O=MyCompany/OU=Dev/CN=celery_worker"

openssl x509 -req -in worker.csr -CA ca_certificate.pem -CAkey ca.key -CAcreateserial \
  -out celery-certs/worker_cert.pem -days 825 -sha256

echo "👤 Generating Celery client cert..."
openssl genrsa -out celery-certs/client_key.pem 2048
openssl req -new -key celery-certs/client_key.pem -out client.csr \
  -subj "/C=US/ST=CA/L=SanFrancisco/O=MyCompany/OU=Dev/CN=celery_client"

openssl x509 -req -in client.csr -CA ca_certificate.pem -CAkey ca.key -CAcreateserial \
  -out celery-certs/client_cert.pem -days 825 -sha256

cp ca_certificate.pem celery-certs/

# Clean up
rm -f *.csr *.srl ca.key

echo "✅ Certificates generated and organized:"
echo "  - rabbitmq/: server_cert.pem, server_key.pem, ca_certificate.pem"
echo "  - celery-certs/: client_cert.pem, client_key.pem, ca_certificate.pem"
6. Store Certificates
Since we are working fully inside Docker, we no longer store certificates directly
under /etc/rabbitmq/ on the host machine. Instead, we place them inside a
project-local directory:
project/
  └── celery-certs/
  └── rabbitmq/
Docker will then mount this folder into the container at runtime:
volumes:
  - ./celery-certs:/etc/rabbitmq/certs
(Docker will preserve these permissions inside the container.)
7. Configuring RabbitMQ for TLS & mTLS
RabbitMQ is configured via an external rabbitmq.conf file that we mount into
the container. Create this file in the root of your project directory:
touch rabbitmq.conf
Then paste the following TLS and mTLS configuration into it:
# load predefined usrs and vhosts
load_definitions = /etc/rabbitmq/definitions.json

# TLS/SSL options
listeners.ssl.default = 5671
listeners.tcp = none

ssl_options.cacertfile = /etc/rabbitmq/certs/ca_certificate.pem
ssl_options.certfile = /etc/rabbitmq/certs/server_cert.pem
ssl_options.keyfile = /etc/rabbitmq/certs/server_key.pem
ssl_options.verify = verify_peer
ssl_options.fail_if_no_peer_cert = true

# Authentication mechanism
auth_mechanisms.1 = EXTERNAL
# auth_mechanisms.2 = PLAIN
# auth_mechanisms.3 = AMQPLAIN
# auth_mechanisms.4 = EXTERNAL

ssl_cert_login_from = common_name

# TLS UI
management.listener.port = 15671
management.listener.ssl = true
management.listener.ssl_opts.cacertfile = /etc/rabbitmq/certs/ca_certificate.pem
management.listener.ssl_opts.certfile = /etc/rabbitmq/certs/server_cert.pem
management.listener.ssl_opts.keyfile = /etc/rabbitmq/certs/server_key.pem
management.listener.ssl_opts.verify = verify_none
management.listener.ssl_opts.fail_if_no_peer_cert = false

# default_user = none
# default_pass = none
One important detail here is the line auth_mechanisms.1 = EXTERNAL.
This enables certificate-based authentication, but it only works if the
rabbitmq_auth_mechanism_ssl plugin is enabled.
RabbitMQ then uses the Common Name (CN) from the client certificate as the username,
which is required for mTLS authentication to function properly. [link]
8. Enable Authentication Plugin
Enabling RabbitMQ’s SSL authentication plugin (rabbitmq_auth_mechanism_ssl) is
required for certificate-based authentication. This plugin allows RabbitMQ to extract the
Common Name (CN) from a client certificate and use it as the RabbitMQ username — which is
the core requirement for true passwordless mTLS.
When working with Docker, this plugin must be enabled inside the image,
not on the host. Attempting to run rabbitmq-plugins on your local machine has
no effect on the containerized instance.
Enabling the plugin in Docker (recommended)
The correct way to enable the plugin is directly inside the Dockerfile so every container bootstraps with mTLS support out of the box:
RUN rabbitmq-plugins enable --offline rabbitmq_auth_mechanism_ssl
This ensures:
- The plugin is active in every environment (local, CI, production)
- No manual commands are required after launching the container
- The configuration is deterministic and reproducible
Alternative: enabling it manually inside a running container
If you want to enable the plugin manually during debugging, you can do so inside the running RabbitMQ container:
docker exec -it rabbitmq rabbitmq-plugins enable rabbitmq_auth_mechanism_ssl
This works but does not persist unless you rebuild your Docker image.
With the plugin enabled, RabbitMQ will map the CN from the client certificate to the corresponding RabbitMQ user, enabling secure and seamless mTLS authentication.
9. Create User Matching Client Certificate CN
For mTLS to work, RabbitMQ must have a user whose username matches the
Common Name (CN) of the client certificate—for example celery_user.
There are two ways to create this user:
Option A — Recommended: Use definitions.json
Create a definitions.json file (shown below) and mount it into the container.
This makes RabbitMQ fully reproducible and eliminates the need for manual commands.
Option B — Using the RabbitMQ CLI
If you prefer creating the user manually inside the running container, you can use:
docker exec -it rabbitmq rabbitmqctl add_user celery_user ""
docker exec -it rabbitmq rabbitmqctl set_permissions -p / celery_user ".*" ".*" ".*"
However, this is not persistent and must be repeated every time unless persisted via definitions.json.
🧾 definitions.json (Optional but Recommended)
Preconfigure RabbitMQ users, permissions, and vhosts at startup.
{
    "vhosts": [
      {
        "name": "my_vhost"
      }
    ],
    "users": [
      {
        "name": "celery_worker",
        "password_hash": "",
        "tags": "administrator"
      },
      {
        "name": "celery_client",
        "password_hash": "",
        "tags": "administrator"
      }
    ],
    "permissions": [
      {
        "user": "celery_client",
        "vhost": "my_vhost",
        "configure": ".*",
        "write": ".*",
        "read": ".*"
      },
      {
        "user": "celery_worker",
        "vhost": "my_vhost",
        "configure": ".*",
        "write": ".*",
        "read": ".*"
      }
    ]
  }
🐳 Dockerfile for TLS-enabled RabbitMQ
To make RabbitMQ fully TLS-enabled inside Docker, we bake the certificates, the rabbitmq.conf file, and the authentication plugin directly into the image. This ensures that RabbitMQ starts with TLS and mTLS support from the very first boot.
Below is a minimal but production-ready Dockerfile that:
- Enables the
rabbitmq_auth_mechanism_sslplugin - Copies all TLS certificates into the correct directory
- Includes the RabbitMQ configuration and definitions
- Sets correct permissions for private key files
The configuration is intentionally simple and easy to extend.
ARG RABBITMQ_VERSION=4-management

# the official image runs as non-root
FROM rabbitmq:$RABBITMQ_VERSION

RUN rabbitmq-plugins enable --offline rabbitmq_auth_mechanism_ssl

# copy the config and the certs files
COPY rabbitmq.conf /etc/rabbitmq/rabbitmq.conf
COPY /rabbitmq /etc/rabbitmq/certs

COPY definitions.json /etc/rabbitmq/definitions.json

# RUN chmod +x /usr/local/bin/rabbitmq_init.sh

# make the certs read/write only from the user that eanbles the MQ server
RUN chmod 644 /etc/rabbitmq/certs/*

EXPOSE 5671 15671
# ENV RABBITMQ_CONFIG_FILE=/etc/rabbitmq/rabbitmq

# # Start the RabbitMQ server using an init script
CMD ["rabbitmq-server"]
🐋 docker-compose.yml
Using docker-compose makes it easy to run a fully TLS-enabled RabbitMQ broker locally or
in development environments. The example below mounts certificates, configuration files, and exposes
the TLS-secured AMQP port 5671 and the HTTPS management UI on 15671.
If you want RabbitMQ to auto-import users, vhosts, permissions, or exchanges on startup, simply provide a
definitions.json file (as shown below).
version: '3.8'

services:
  rabbitmq:
    build: .
    ports:
      - "5671:5671"
      - "15671:15671"
10. Celery Configuration (TLS + mTLS)
Celery connects to RabbitMQ over AMQP, which means every worker maintains a persistent TCP connection.
When enabling TLS or mTLS, the connection must be wrapped in SSL using Python’s ssl module.
The configuration below enables full Mutual TLS (mTLS), meaning:
- The Celery worker verifies the RabbitMQ server certificate
- RabbitMQ verifies the Celery worker certificate
- No username/password authentication is required
This setup provides strong identity guarantees and is ideal for microservices, Kubernetes clusters, or zero-trust environments.
# my_celery_app.py
from celery import Celery
import os
import ssl


CERTS_BASE = "celery-certs"

# Verify that the certificate files are accessible
if not os.path.exists(os.path.join(CERTS_BASE, "ca_certificate.pem")):
    raise FileNotFoundError("CA certificate not found")
if not os.path.exists(os.path.join(CERTS_BASE, "worker_cert.pem")):
    raise FileNotFoundError("Client certificate not found")
if not os.path.exists(os.path.join(CERTS_BASE, "worker_key.pem")):
    raise FileNotFoundError("Client key not found")


# Initialize Celery app
app = Celery(
    "worker",
)

# Update Celery configuration
app.conf.update(
    broker_url=f"amqps://rabbitmq:5671/my_vhost",
    broker_use_ssl={
        "ca_certs": os.path.join(CERTS_BASE, "ca_certificate.pem"),
        "certfile": os.path.join(CERTS_BASE, "worker_cert.pem"),
        "keyfile": os.path.join(CERTS_BASE, "worker_key.pem"),
        "cert_reqs": ssl.CERT_REQUIRED,
        "ssl_version": ssl.PROTOCOL_TLS_CLIENT,
    },
    broker_login_method="EXTERNAL",  # Only if you're using EXTERNAL authentication
    result_backend="rpc://",
    result_expires=3600
)

if _name_ == "_main_":
    app.start()
celery -A my_celery_app worker -l info11. Testing TLS & mTLS
Before connecting Celery or any application, it is highly recommended to test the TLS handshake manually
using openssl s_client. This helps confirm that:
- The server certificate is valid
- The CA is trusted
- The client certificate is accepted (for mTLS)
- No hostname or certificate mismatch errors appear
The command below performs a full TLS handshake using your CA, client certificate, and private key:
openssl s_client -connect localhost:5671 \
  -CAfile rabbitmq/ca_certificate.pem \
  -cert celery-certs/client_cert.pem \
  -key celery-certs/client_key.pem
12. Architecture Diagrams
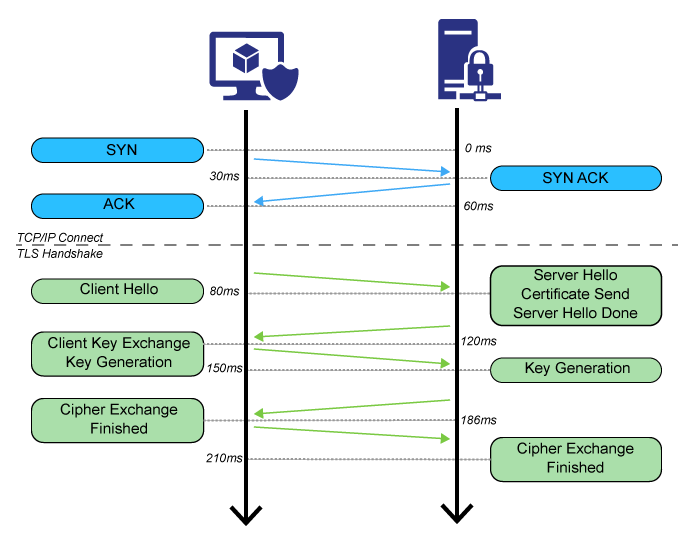
RabbitMQ with TLS (Encrypted Connection)
This diagram shows basic TLS: the connection is encrypted and the client verifies the server's certificate. The server does not verify who the client is.
RabbitMQ with mTLS (Mutual Authentication)
With mTLS, both sides verify each other using certificates. This ensures that only trusted applications can connect to RabbitMQ.
13. Troubleshooting
| Error | Meaning | Fix |
|---|---|---|
| unknown ca | Client doesn't trust CA | Use correct CA file |
| hostname mismatch | Server CN doesn't match host | Regenerate cert |
| Access refused | CN mismatch | Create RabbitMQ user = CN |
| Permission denied | Key unreadable | chmod 600 key files |
14. Security Best Practices
- Disable port 5672 (unencrypted AMQP) to enforce TLS-only communication.
- Ship only TLS 1.2 or 1.3; disable older, insecure protocol versions.
- Rotate certificates on a regular schedule or automate rotation with CI/CD.
- Use separate vhosts per application to isolate permissions and reduce blast radius.
- Prefer Mutual TLS (mTLS) for internal microservices and zero-trust environments.
- Restrict private key access (e.g.,
chmod 600) and avoid embedding keys in images. - Monitor TLS handshake failures via RabbitMQ logs and Prometheus exporters.
- Use strong cipher suites and disable deprecated algorithms where possible.
- Adopt the principle of least privilege in user/vhost permissions.
When properly configured, TLS and mTLS transform RabbitMQ into a reliable, secure messaging backbone— protecting every Celery worker, microservice, and background job that depends on it. By combining encrypted transport, certificate-based authentication, and Dockerized configuration, you create a modern, production-ready setup that can scale confidently and securely.
If you're implementing secure messaging in distributed systems, mastering TLS and mTLS with RabbitMQ is a powerful investment—one that pays off with stronger resilience, safer services, and greater trust across your infrastructure.
Further Reading & References
- RabbitMQ TLS & Certificates — https://www.rabbitmq.com/ssl.html
- Authentication using SSL certificates — https://www.rabbitmq.com/authentication.html#ssl
- Official RabbitMQ Docker Image — https://hub.docker.com/_/rabbitmq
- Celery Security & SSL Docs — https://docs.celeryq.dev/en/stable/userguide/security.html
- OpenSSL Documentation — https://www.openssl.org/docs/